Big Data on your local machine : Installing Hadoop Cluster (Multi Node regime)
A few days ago I published an article about Hadoop installation (in Single Node regime). After that I received so many emails from guys who wanted to change their single node to cluster (Multi-Node regime).
So, I’ll help you ‘cause I had similar problems a few months ago when my System Administrator took his holidays and left me face to face with a lot of single machines without Cluster Ring of Power.
Thinking about future cluster
Let’s start!
Of course, we should have a Virtual Machine (VM) with Ubuntu 14.10 and installed Hadoop 2.6.0 according instructions from previous paper.
In the first, we need to design future cluster and understand how many nodes are required for our deals. If it is your first cluster and your have few separated primary nodes, it will be easy to join them one by one.
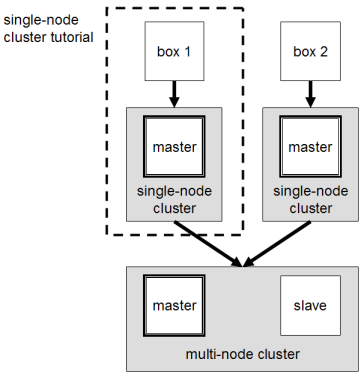
The master node will run the ‘father’ threads for each floor: NameNode for the HDFS storage layer, and JobTracker for the MapReduce processing layer. All machines (including master) will run the ‘child’ daemons: DataNode for the HDFS layer, and TaskTracker for MapReduce processing layer.
Basically, the ‘father’ threads are responsible for coordination and management of the ‘child’ daemons. ‘Child’ daemons are responsible for real data processing and can be easy stopped or recreated by ‘father’ thread. Of course, in the small cluster we no needs in separate machines for history server or other ‘father’ processes.

The first breath
The first breath
The existing node with working Hadoop can be a primary (master) node and we can copy an image of this node after some preparations.
Please rename the primary node to ‘master’ by changing current name stored in ‘hostname’ file.
$ sudo nano /etc/hostname
Disable IPv6 by modifying /etc/sysctl.conf file, put the following lines in the end of the file.
# IPv6

net.ipv6.conf.all.disable_ipv6 = 1

net.ipv6.conf.default.disable_ipv6 = 1

net.ipv6.conf.lo.disable_ipv6 = 1
Change an old hostname ‘localhost’ on ‘master’ in core-site.xml.
$ sudo nano /usr/local/hadoop/etc/hadoop/core-site.xml
Add yarn schedule settings in yarn-site.xml
$ sudo nano /usr/local/hadoop/etc/hadoop/yarn-site.xml
<property>
       <name>yarn.resourcemanager.scheduler.address</name>
       <value>master:8030</value>
</property>
<property>
       <name>yarn.resourcemanager.address</name>
       <value>master:8032</value>
</property>
<property>
       <name>yarn.resourcemanager.webapp.address</name>
       <value>master:8088</value>
</property>
<property>
       <name>yarn.resourcemanager.resource-tracker.address</name>
       <value>master:8031</value>
</property>
<property>
       <name>yarn.resourcemanager.admin.address</name>
       <value>master:8033</value>
</property>
Nodes mitosis
Let’s begin the process of reproduction…
In this case we will create a 3 slave nodes with next names: slave1, slave2 and slave3. No big deal, yeah?
Please copy our master node three times and check that all copied nodes are available. After that we collect all internal IPv4* and put it in the hosts file as pairs (ip, hostname).
<internal ip> slave1

<internal ip> slave2

<internal ip> slave3
$ sudo nano /etc/hosts
For example, in Google Compute Engine, it’s very easy to evaluate by the one command:
$ sudo /usr/share/google/safe_format_and_mount
-m "mkfs.ext4 -F"
-o defaults,auto,noatime,noexec
/dev/sdc /usr/local/hadoop_store/hdfs/datanode
The next command will help us to verify the result of the disk mount
$ df -h --total
At the end, we should connect to each slave node by SSH and format Namenode directory
$ ssh slave1
$ hdfs namenode -format
$ logout
Elephant escaped from the zoo
But how Hadoop will know about slave nodes? Hadoop reads the list of slaves from special slaves file. We should delete ‘localhost’ and add list of slaves.
$ sudo nano /usr/local/hadoop/etc/hadoop/slaves


master
slave1
slave2
slave3
But Hadoop cluster doesn’t work yet because we forgive about the power of SSH: we need to say our master node that it can has unsafe contacts with slave nodes.
Add new slave hosts to the list public keys :
$ ssh-copy-id -i $HOME/.ssh/id_rsa.pub hduser@slave1

$ ssh-copy-id -i $HOME/.ssh/id_rsa.pub hduser@slave2

$ ssh-copy-id -i $HOME/.ssh/id_rsa.pub hduser@slave3
Please restart all running datanodes and namenodes by next commands:
$ stop-yarn.sh
$ stop-dfs.sh

$ start-yarn.sh
$ start-dfs.sh
In proboscis conclusion
Now we have a running cluster with simple settings and, of course, we can parallelize our MapReduce jobs. It’s enough for debugging and development but maybe isn’t enough for production.
The next article about Hadoop MapReduce settings is coming soon!
So Long, and Thanks for all the Fish!


Комментарии
Отправить комментарий